NOTE: This article is continsously in progress. If something is missing or not clear, please reach out to support and we will update the article.
On this page:
Overview
EasyVFR 4 offers a range of route planning tools that cater to various workflows and subscription tiers. Depending on your subscription:
Essential and Live: Map-based route creation and manipulation using Route Totals and the Route Card.
Pro and FFM: In addition to the above, you unlock advanced features such as importing/exporting routes, saving routes to the cloud, Automatic Routing, TripKit PDF conversion, and more.
Key UI Elements and Terminology
Planning Mode
When you are planning a route, you are in Planning Mode. This is the default mode when you open EasyVFR 4. During planning mode, the route totals are about the whole active route.
Flying Mode
When your ground speed is above the set takeoff speed in your aircraft profile, EasyVFR automatically switches to flying mode. During flying mode, the route information is about the remaining route to the destination.
Leg Labels
Over each route leg, a label displays key information about that segment:
Purpose:
Display leg direction, course, duration, distance, and altitude in this format:285° 7min 8nm 2600ftCalculation Details:
Planning Mode: Duration is calculated using your aircraft profile and forecast wind aloft.
Flying Mode:
Current leg: Uses actual ground speed and distance to next waypoint
Future legs: Uses planned values from aircraft profile and wind
Decluttering:
As you zoom out or space becomes limited, information is removed in this order:Full label:
285° 7min 8nm 2600ftWithout altitude:
285° 7min 8nmWithout distance:
285° 7minCourse only:
285°Hidden completely (at lowest zoom levels)
Tip: Zoom in on a leg to see more details.
Customization:
Can be disabled via Map Layers → AeroData → Leg Labels.
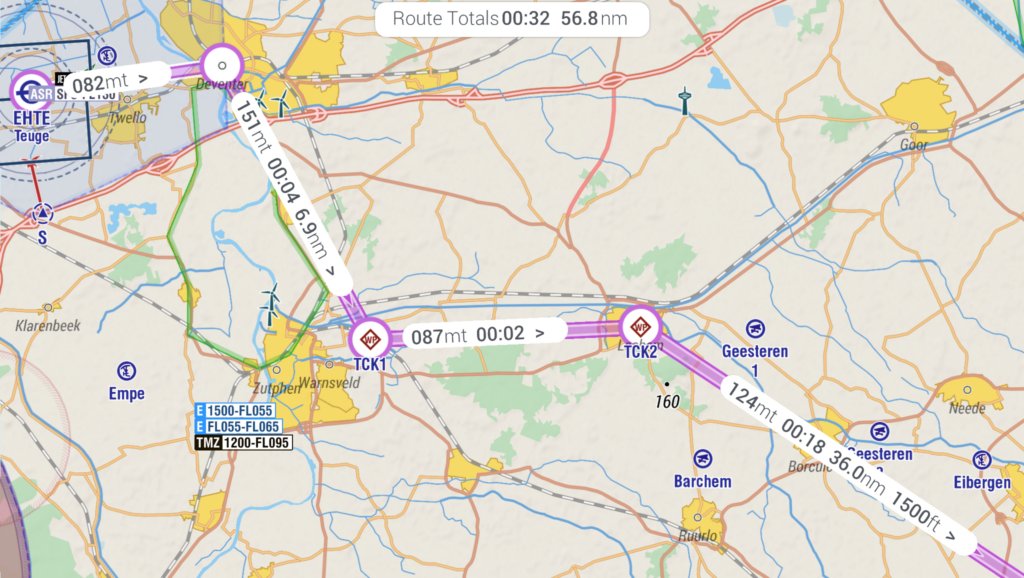
Route Totals
The Route Totals bubble provides an at-a-glance view of your total flight duration and distance. Its position and information adapt based on your flight phase:
Planning Mode: When a route is active, the Route Totals Bubble appears at the top center of the map, showing the total duration and distance for your entire route.
Flying Mode: The bubble moves to the bottom center of the map and displays the remaining duration and distance to your destination. For a Local Flight, it shows distance to the center of your local flight area.
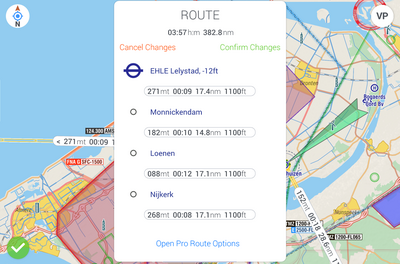
Route Card
When you tap the Route Totals bubble, the Route Card opens. The Route Card offers a clean overview of the route waypoints and the legs in between, showing the same information as the Leg Labels on the map: Course, Duration, Distance, and Altitude.
Displayed Information: Lists route waypoints and details for each leg; course, duration, distance, altitude.
(285° | 7min | 8nm | 2600ft).Additional Options:
Stop Route: Red text to quickly restart.
Cancel/Confirm Changes: Yellow legs indicate edits; confirm with green text or cancel with red text.
Open Pro Route Options: Blue tappable-text for advanced settings.
Other Interactions:
View Waypoint on Map: Tap a waypoint icon to center the map on it.
Close Route Card: Like all cards in EasyVFR 4, you can close it by either tapping outside the card on the moving map, or tapping the title/icon in the header.
In-Flight Behavior: Automatically scrolls to show your current leg and highlights the active leg.
Route Colors
Routes in EasyVFR 4 use different colors to indicate their status:
Yellow Route: Indicates a route that is still in edit mode and needs to be confirmed.
Magenta (Pink/Purple) Route: Shows an active, confirmed route that is ready for navigation.
Rubberbanding
Rubberbanding refers to the ability to click and drag a route line on the map to modify it. When you drag a route line, it will "stretch" like a rubber band, allowing you to insert new waypoints or adjust the route path interactively.
Units
You can customize the units used throughout the app (distance, altitude, duration, etc.) in the EasyVFR 4 menu (logo button) under Preferences → Units.
Flexible Workflows to Build Your Route
EasyVFR 4 offers several ways to create and edit your routes. Choose the method that works best for you or combine different approaches:
Interactive Map Tapping (All Tiers):
The most intuitive way to plan - tap the map to place waypoints and drag route lines (rubberband) to adjust. Perfect for visual planners who like to work directly with the map.Step-by-Step Pro Route Planning Menu (Pro and FFM Only):
A guided approach that walks you through each step of route creation, with more options and details.VFR Automatic Routing (Pro and FFM Only):
Let EasyVFR 4 calculate a route that avoids airspaces and high terrain. Perfect for planning in unfamiliar areas or complex airspace.Type Your Route (Pro and FFM Only):
Quickly create routes by typing ICAO codes or pasting flight plans. Great for experienced users who know their waypoints or when copying routes from other sources.Import, Export, and Share Routes (Pro and FFM Only):
Exchange routes with other apps and pilots. Supports common formats like FPL (ForeFlight), GPX (Garmin), and more.Local Flight (All Tiers):
Special mode for flights that stay near one airport. Perfect for training flights, sightseeing, or when you don't need a full route.Direct-To and Continue (All Tiers):
In-flight feature to skip waypoints and fly directly to any point in your route. Useful when ATC gives you a direct routing or when deviating from your plan.User Waypoints (All Tiers):
You can add your own waypoints to your route. This is useful when you want to fly to a specific point or when you want to create a custom route.
Map-Based Route Creation and Editing
Long Press on Map
A long press opens the route Info Sheet, offering the tapped location as a new waypoint. This sheet displays route actions for the selected object and lists other nearby navaids, airfields, and places below. To switch to another object in the list, simply tap on it.
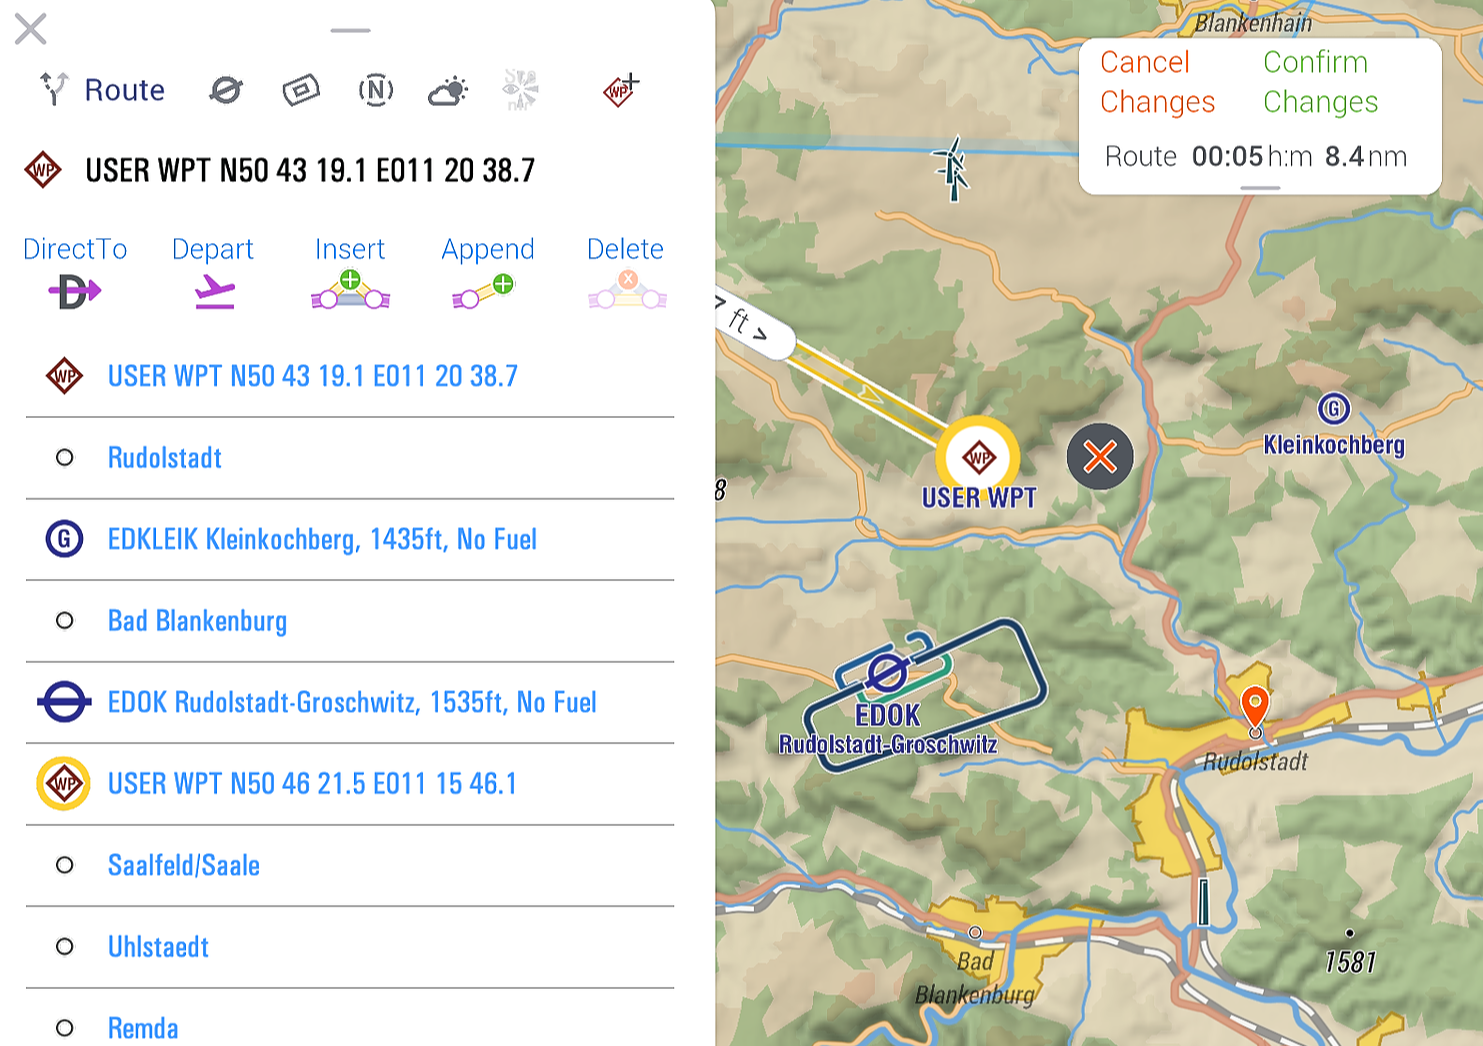
Single Tap on an Airfield or AeroData Object
Tapping an object on teh map opens its Info Sheet, where available route actions include:
Direct-To: Create a straight-line leg from your current position.
Depart: Set the starting point of your route.
Insert: Insert a waypoint at the most logical position.
Append: Add the waypoint to the end of the route.
Delete: Remove the waypoint from the route.
Tap to Append to Route
When starting a new route by selecting "Depart" or "Direct-To" from an Info Sheet, the next object you tap is automatically appended to your route.
Note: This is active only while building a new (yellow) route. After further edits (e.g., rubberbanding or inserting), the feature deactivates. Confirm your route by tapping the green Confirm Changes text on the Route Card.
User Waypoint – Long Press on Map
A long press on the map opens the Route Info Sheet, offering the tapped location as a waypoint along with nearby navaids, airfields, and landmarks. Simply tap a listed object to select it.
Pro Route Planning Menu and Route Tools
Access:
From the Route Card: Tap the blue link at the bottom of the card.
From the Bottom Button Bar: Select the Route button.
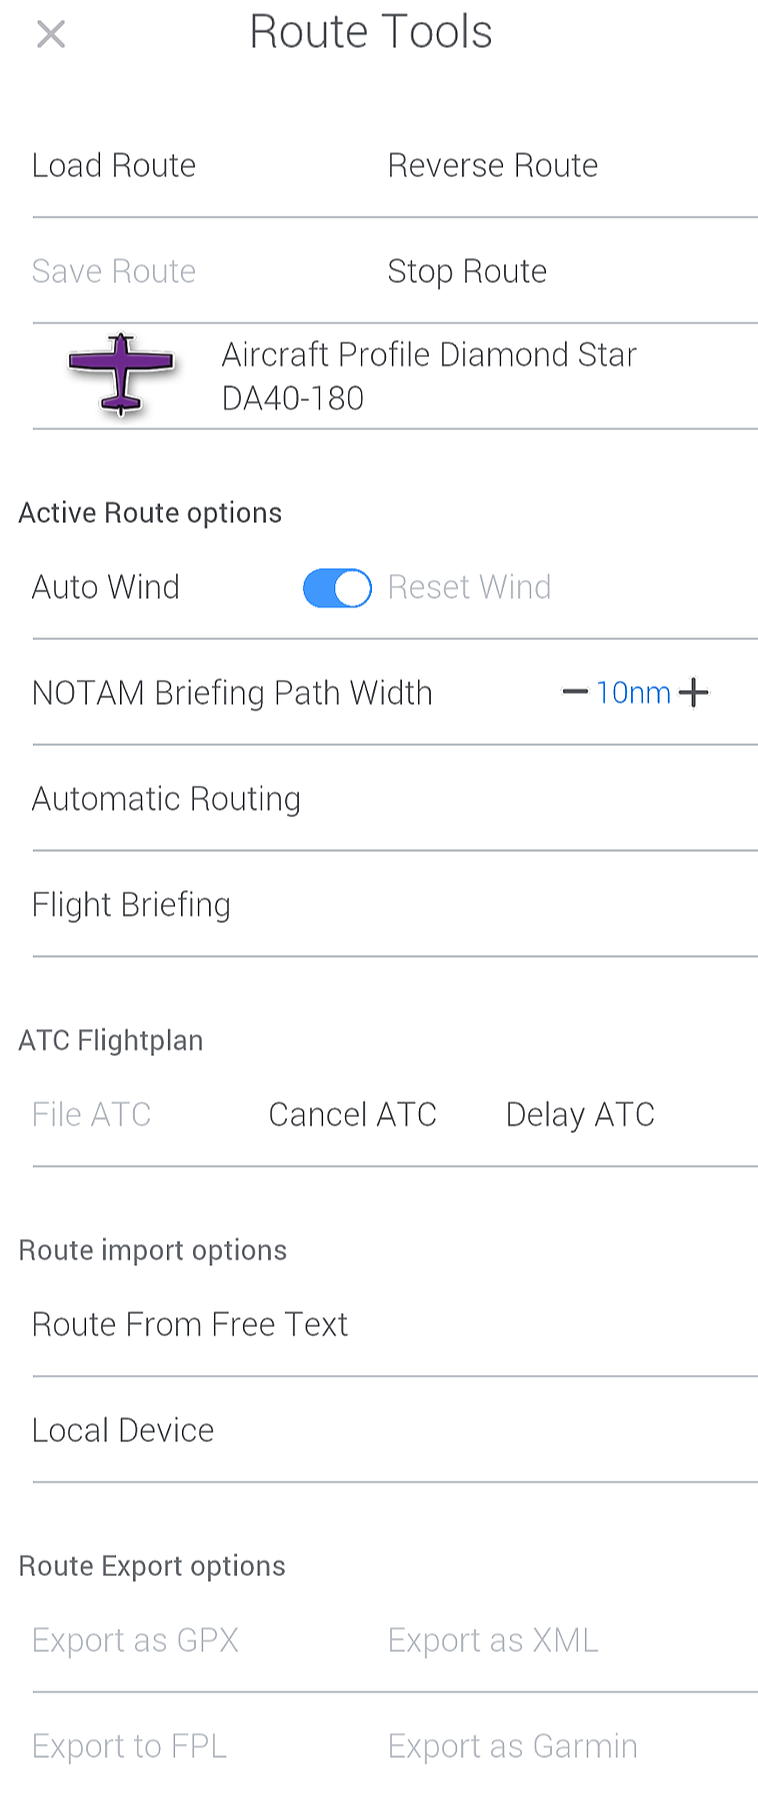
Pro Route Tools
Once in the Pro Route Planning menu, tap the tools button (located at the top left) to access additional Route Tools, which provide refined control over your routes, including advanced editing, importing/exporting, and cloud storage options.
Create a Route Step by Step
When you open the Pro Route Planning menu without an active route, you'll be presented with two options: Local Flight and Trip Flight.
Choose Trip Flight to create a route step by step from A to B to C to D, etc., using the built-in search function.
Note:
EasyVFR 4 supports two variants of flight planning:
Local Flight:
A Local Flight does not require a planned route. Instead, EasyVFR 4 compiles all relevant flight information within a chosen radius of the departure point.Trip Flight (Cross-Country):
You plan a route with any number of waypoints and receive detailed information along your entire route.
The following example demonstrates creating a Trip Flight:
Set the Departure Point:
Tap on Departure Airfield.
In the search field, enter your departure airport. For example, type "EDDW" for Bremen.
Tap OK and then select the result (e.g., EDDW Bremen) by tapping the yellow-highlighted line.
This sets EDDW Bremen as your departure airfield.
Add the Destination:
Tap Arrival or Next Waypoint.
In the search field, enter your destination. For example, type "Hamburg."
After tapping OK, EasyVFR 4 displays a list of matching results (airfields, radionavigation facilities, and locations).
Under the airfield tab, tap the yellow-highlighted result for EDDH Hamburg.
Then, tap APPEND to add EDDH Hamburg as the next waypoint in your route.
Insert an Additional Waypoint:
With your departure and arrival airfields set, your route is displayed in the waypoint list.
To add an additional waypoint (for example, an intermediate airfield), tap Arrival or Next Waypoint "Tap to Add".
For more editing options, tap the tools icon for the selected route segment, then choose INSERT to insert a new waypoint.
In the search field, enter the name or ICAO code of the waypoint (for example, type "Stade").
Tap the yellow-highlighted result (e.g., EDHS Stade) and then tap INSERT.
Your waypoint list will now display a route from Bremen via Stade to Hamburg.
Confirm the Route:
Initially, every newly created route in EasyVFR 4 is shown as a yellow concept route.
To finalize your route, tap the magenta Active Route button to confirm the changes and set the route in progress.
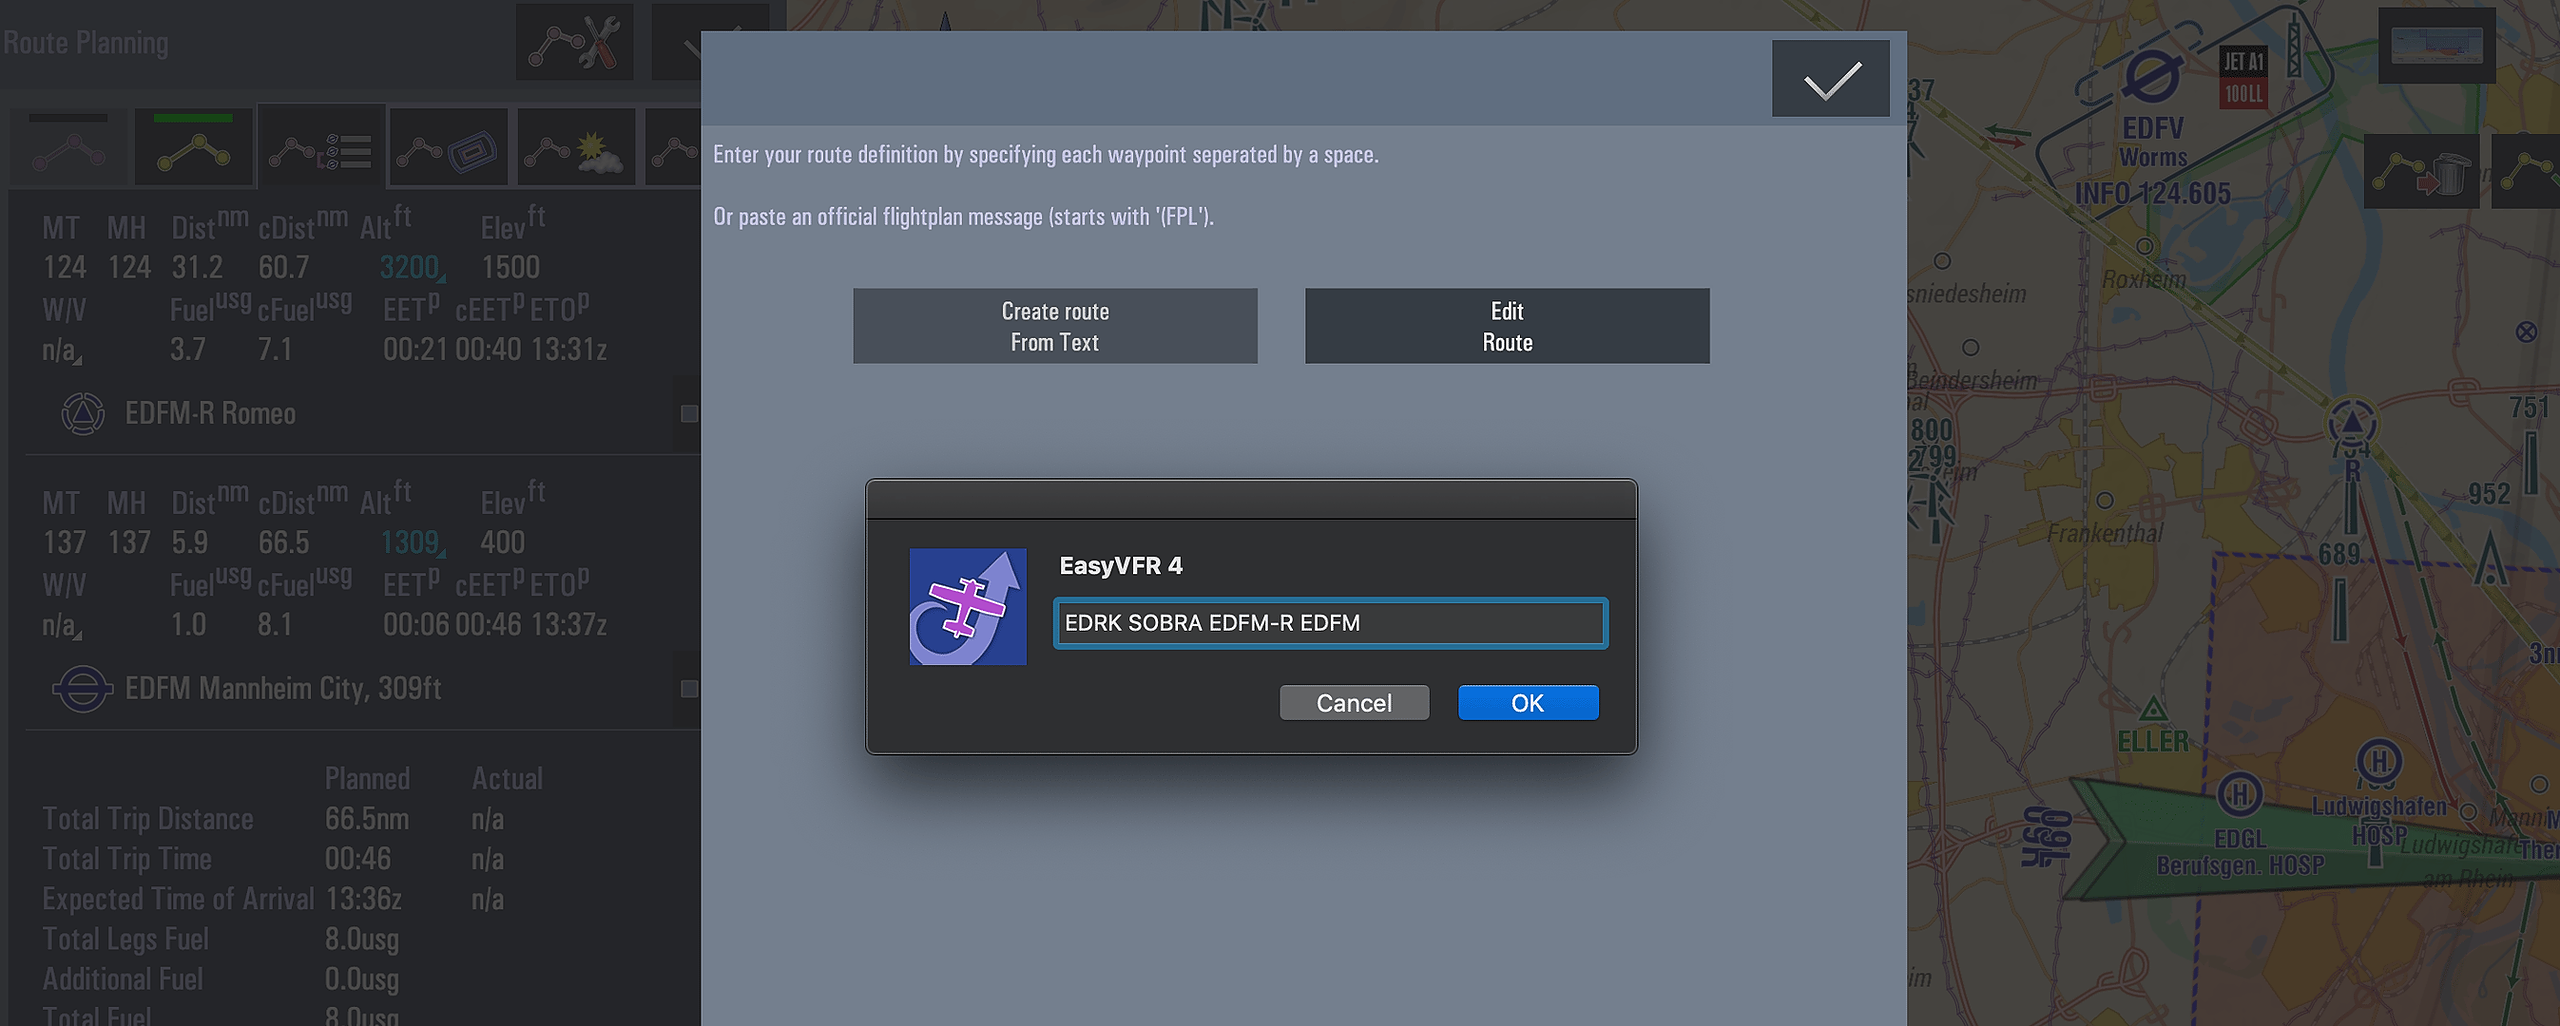
Creating Routes Using Free Text (Type Your Route)
The Free Text feature (available in Pro and FFM tiers) allows you to quickly generate a route by simply typing ICAO identifiers or pasting an official flight plan message.
You find this at Pro Route Planning menu → Route Tools → Route From Free Text.
How It Works:
Enter Waypoints:
Type a series of waypoints as ICAO codes or names in a continuous string. For example, entering:EHLE EHTEcreates a route from Lelystad (EHLE) to Teuge (EHTE).Paste Flight Plan Messages:
You can also paste an official ICAO flight plan message into the text field.Generate the Route:
Once you've entered your text, tap Create Route From Text. This action generates a yellow draft route, which you can later adjust using the Route Planning menu or by rubberbanding on the map.
Tips for Best Results:
Keep AeroData Updated:
Ensure your AeroData is current to include the latest IFR/VFR route identifiers.Formatting Guidelines:
Spacing: Separate each waypoint with a space. For example "EHLE EHTE" for a route from Lelystad to Teuge.
Airport Procedures: Use a dash
(-)to denote waypoints that are part of an airport procedure. For example "EHLE EHLE-B EHTE-S EHTE" indicating a route starting from EHLE, proceeding to its VFR reporting point Bravo, then to EHTE's VFR reporting point Sierra, and finally arriving at EHTE.
Supported Identifiers:
You can use ICAO identifiers for airfields, VORs, DMEs, NDBs, VFR reporting points, IFR waypoints, and more.Official Flight Plan Format:
An official flight plan message should start with an opening bracket followed byFPL(e.g.,(FPL-PHWOH-ZG)) and end with a closing bracket. Airway identifiers within the message are recognized, and each associated waypoint is automatically added to your route.An example official ICAO flight plan you can copy/paste is:
(FPL-PHWOH-ZG
-DA40/L-SDFGRY/SB2
-EHLE1130
-N0120A030 DCT NYKER/N0120A030 IFR Q21 INKET
-EHRD0055 EHSE EHTE
-PBN/B2C2D2O2S1 DOF/210806 RMK/IFR TRAINING FLIGHT
-E/0400 P/2 R/VE
A/WHITE WITH RED AND BLUE STRIPES
C/WEIJERS)
Using the Free Text method, you can rapidly create a draft route that serves as a foundation for further refinement, making it an efficient tool for text-oriented route planning.
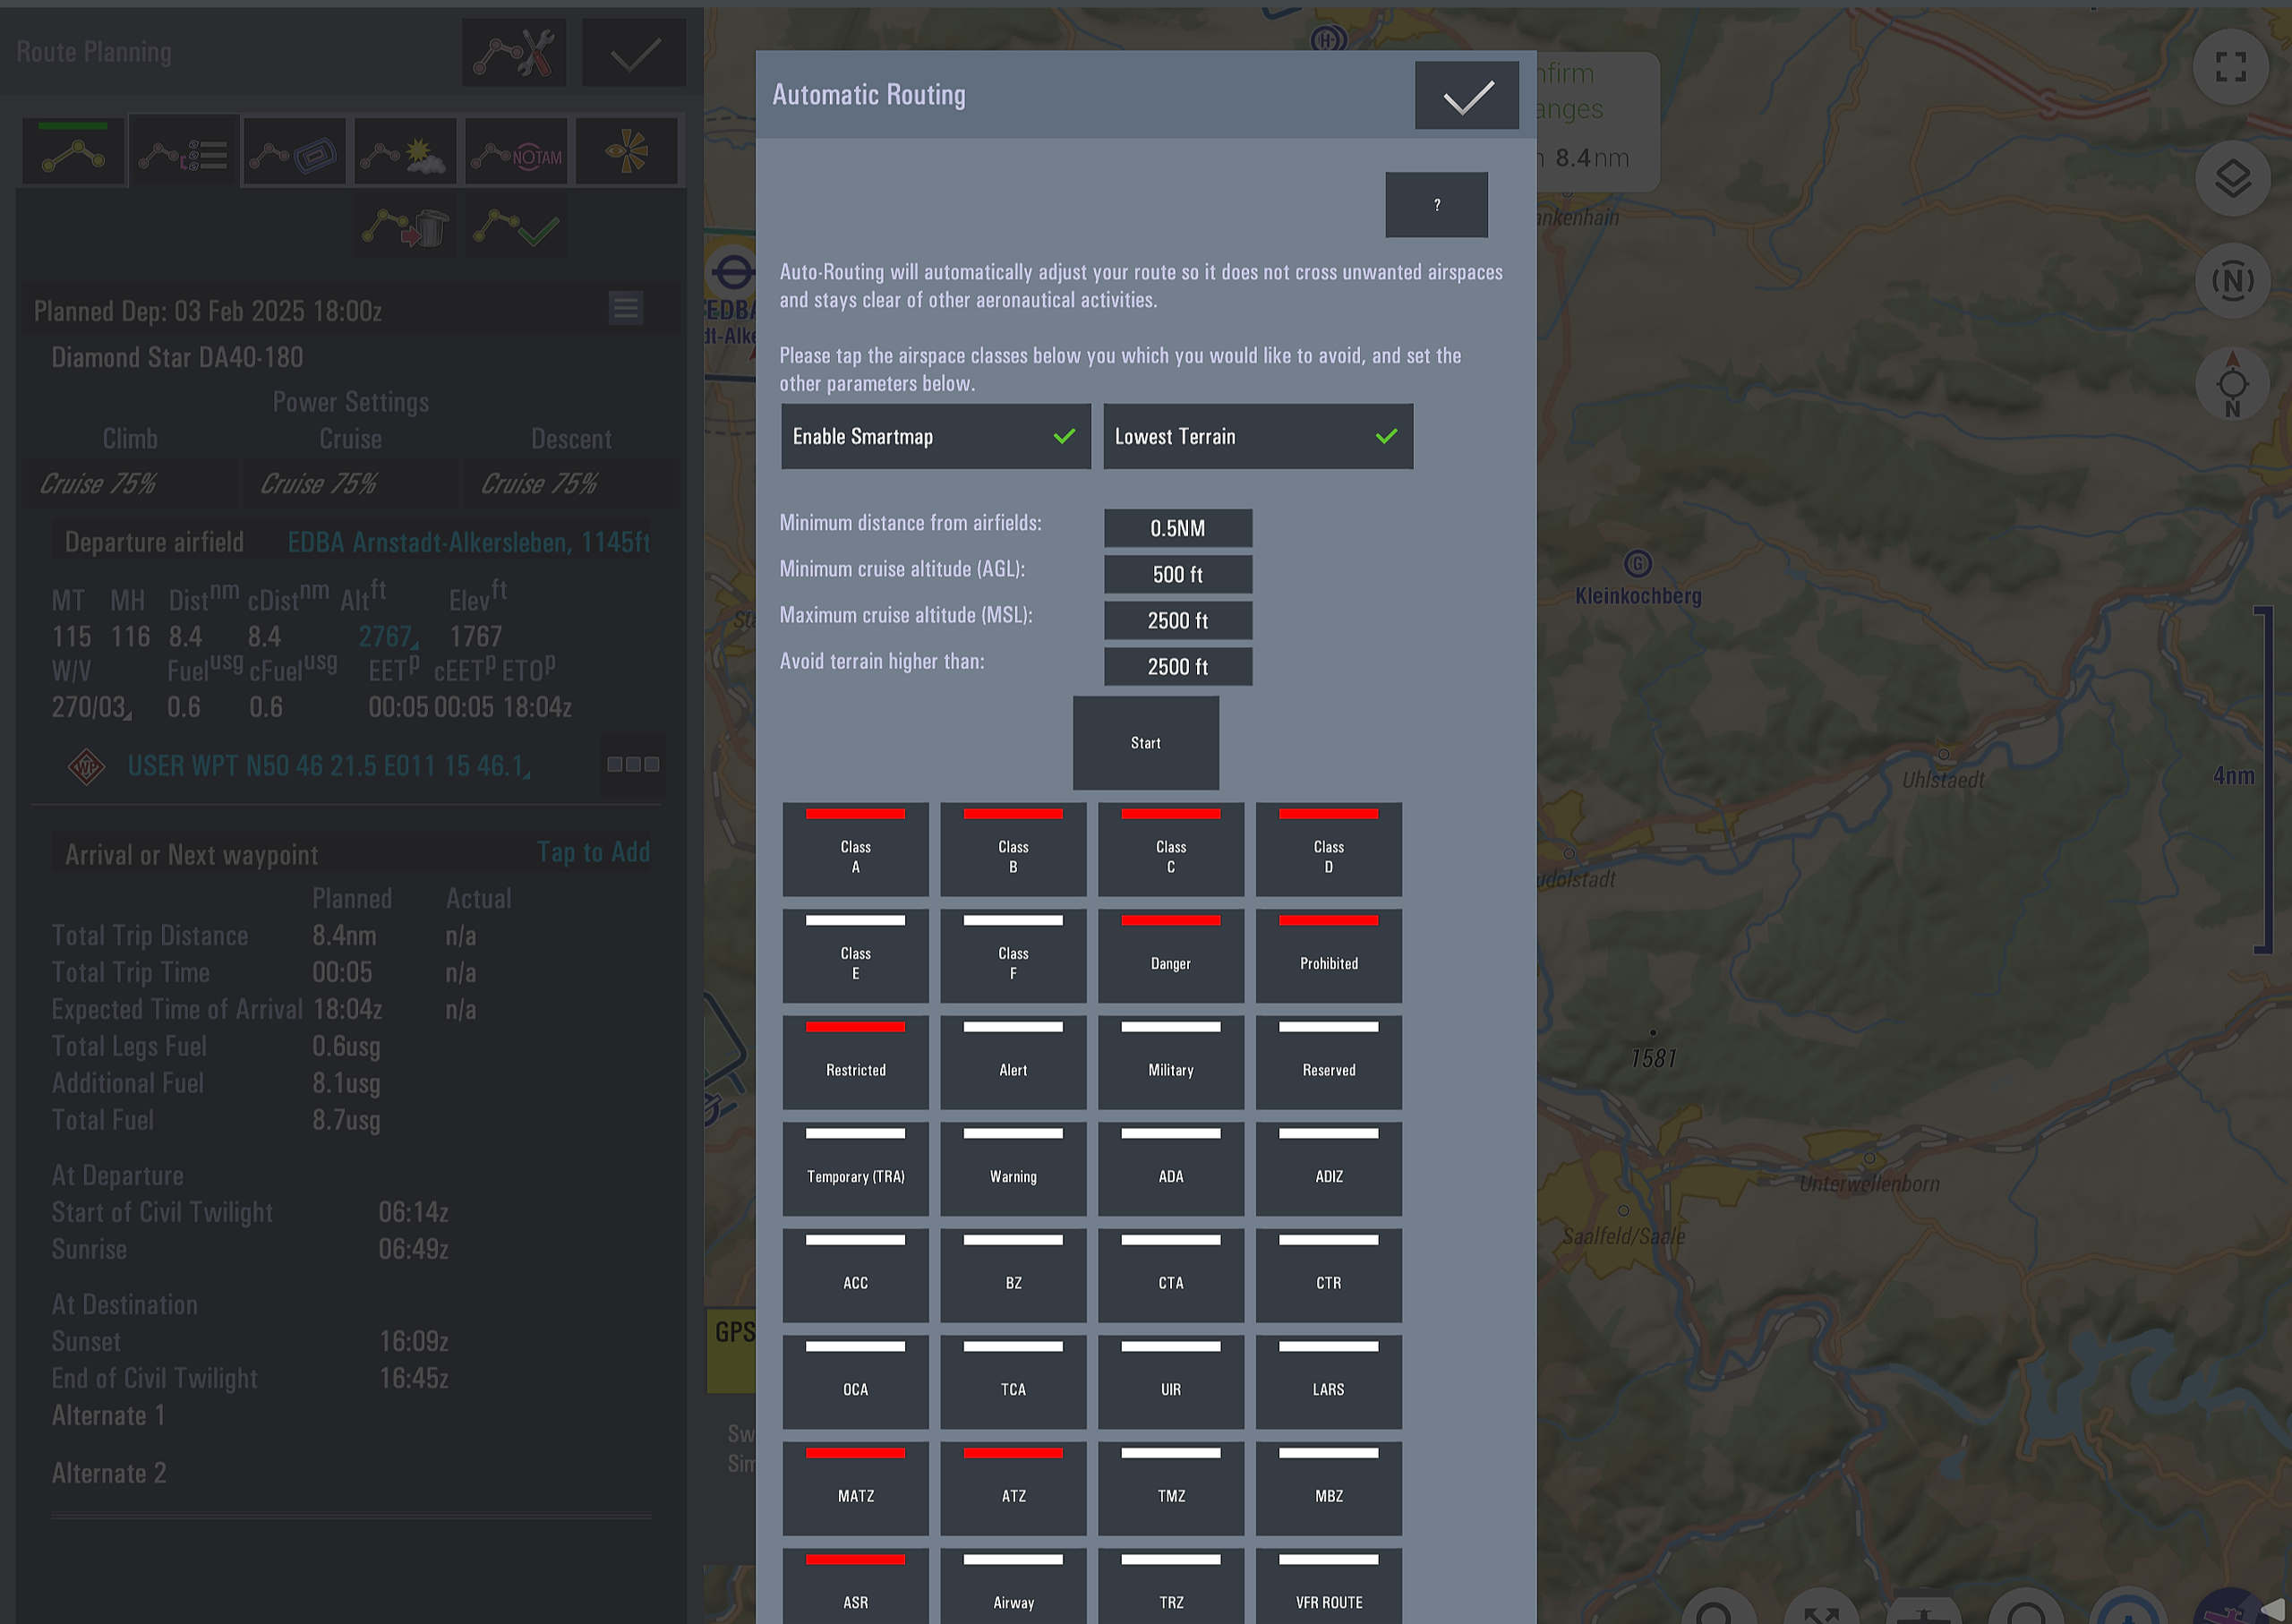
VFR Automatic Routing
EasyVFR 4 can optimize your VFR flight planning by automatically routing your flight around selected airspaces and high terrain. This feature is designed to help you avoid areas you prefer to steer clear of while planning a safe and efficient route through valleys and lower terrain. It is like an IFR AutoRouter but then for VFR flights.
How to Use Automatic Routing:
Create a Base Route:
First, create a straight-line route from point A to point B using your preferred workflow (map tapping, text entry, or step-by-step menu).Access Automatic Routing:
Navigate to Pro Route Planning menu → Route Tools → Automatic Routing.Configure the Options:
The default settings work for most users and typical VFR use cases. You can adjust the following options:Enable SmartMap:
Considers current airspace activations to help you avoid restricted or congested areas.Lowest Terrain:
Optimizes your route to navigate through valleys, reducing the risk of encountering high terrain.Minimum Distance from Airfields:
Ensures the route avoids crossing near airport traffic patterns.Cruise Altitude Range:
Set the minimum (AGL) and maximum (AMSL) cruise altitudes for your flight.Terrain Avoidance:
Automatically avoids terrain higher than its AMSL elevation.Airspace Avoidance:
Select specific airspace classes or types to avoid. The red-selected classes/types will be bypassed during route calculation.
Start the Calculation:
Press the Start button to begin the automatic routing calculation.
Note: For long distances or complex situations, the calculation may take several minutes even on high-performance devices. If the process takes too long, consider planning a shorter distance.
Important:
The route generated by the Automatic Routing feature is advisory and intended to help you get started with planning in unfamiliar areas. Always manually review and verify every step of the planned route before proceeding with your flight
Import and Export Routes
EasyVFR 4 allows you to import and export routes in several common formats, making it easy to share and collaborate with other pilots and applications.
Supported Import Formats
.fpl: The FPL format is widely used for sharing routes, especially with ForeFlight.
.gpx: Typically used by Garmin and several other platforms.
.xml: Used by EasyVFR 4 and several other applications.
Importing Routes
On Android and iOS:
When you receive a route file (via WhatsApp, email, or cloud storage like Google Drive), select/open the file and choose Open with..., then select EasyVFR 4 from the list.On Windows:
Simply copy the route file into this directory:"C:\Program Files (x86)\EasyVFR 4\Inbox"
Exporting Routes
To export an active route:
Navigate to the Pro Route Planning menu (accessible via the route button on the bottom button bar).
Select Route Tools (located at the top left of the Pro Route Planning menu).
Scroll down to the Route Export Options section.
Available export formats include:
GPX - Compatible with many GPS devices and applications
XML - EasyVFR's native format
FPL - For sharing with ForeFlight and other flight planning apps
Garmin - Specific format for Garmin devices
Save Route to EasyVFR Cloud
You can also save an active route to the EasyVFR Cloud or load one from there using the Route Tools. This is especially useful if you use multiple devices and want to access your planned routes consistently.
Additionally, there is an option to share routes with any EasyVFR user. For more detailed instructions, please refer to the instructional video in the related article in the knowledge base.
Local Flight
A Local Flight is a route with a single waypoint—the departure location. It's created when a route existes out of just one waypoint, the start. When there is no route or Local Flight created before flying, EastVFR creates a Local Flight automatically when it switches to flying mode, by taking the start as the destination to provide somewhat relevant guidance during the flight back.
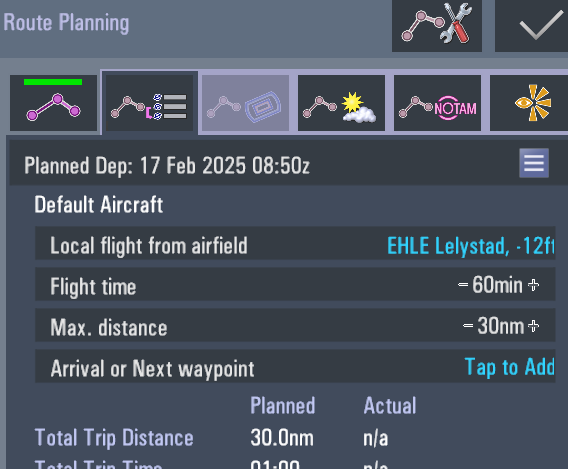
Configuration:
Essential and Live users: Create a route with a single waypoint (only a departure) using any other workflow.
Pro and FFM users: Enable a Local Flight area by navigating to Pro Route Planning menu → Local Flight. Set your departure airfield, duration, and maximum distance.
Map Indication:
In Local Flight mode, areas outside the set range are darkened on the map.Route Totals Adaptation:
For Local Flights, the Route Totals display the duration and distance toward the center of the Local Flight area.Vertical Profile Enhancements:
When planning a Local Flight, the Vertical Profile shows comprehensive weather information for your area:Wind aloft forecasts
Cloud density predictions
SIGMET (Significant Meteorological Information)
All weather data covers your entire Local Flight area for the upcoming hours
Flight Mode Display:
In flight mode, you'll also see the area for which the flight preparation was created.
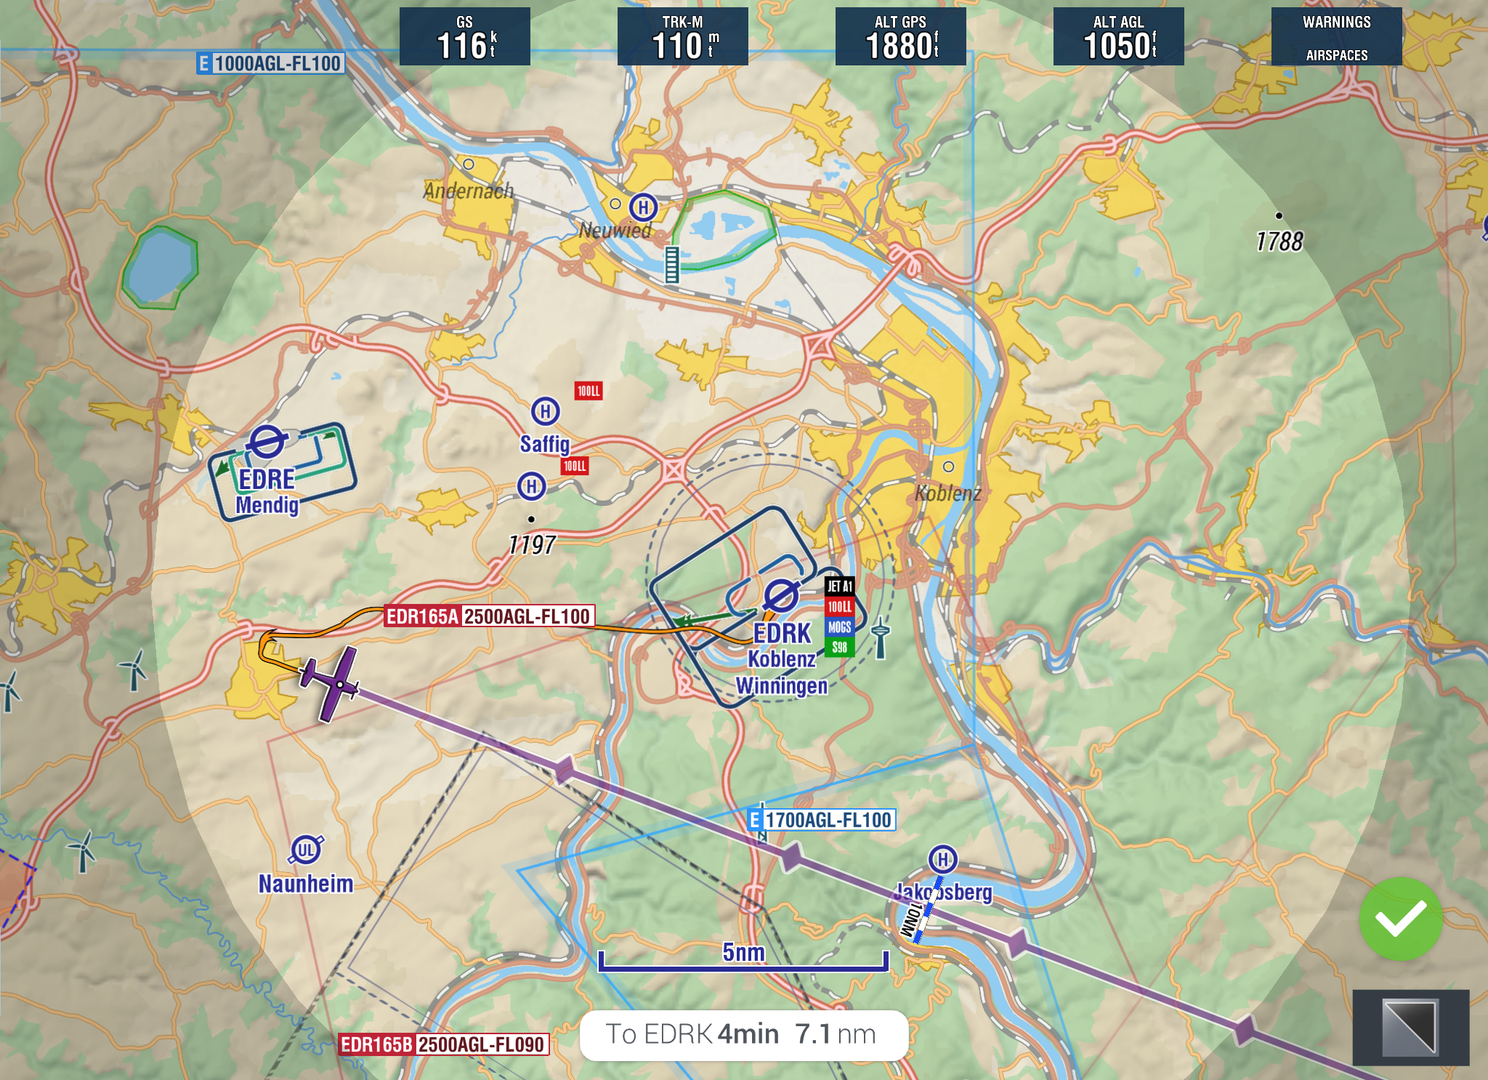
Briefing Area:
The highlighted circle on the map represents the area for which your NOTAM briefing is applied. When planning a Local Flight, EasyVFR 4 needs to know the area to provide a NOTAM briefing for. The default area is a 30nm radius around the start location and 60 minutes flight time. Pro and FFM license holders can customize this in the Pro Route Planning menu:The "Max Distance" setting in the route window determines the radius around your departure airport for which EasyVFR 4 will provide a NOTAM briefing.
This radius is visually represented by the highlighted circle on the map.
Converting to Local to Trip Flight:
You can easily convert a Local Flight into a Trip Flight at any time by adding a waypoint to the route using any of the described workflows.
Direct-To Waypoint of Active Route
One of the most-requested features is finally here! With a route loaded in Flying mode, you can now re-route on the fly to any upcoming waypoint:
Route Card Shortcut:
Open the Route Card and spot the three dots next to an upcoming waypoint.
Select Direct-To. EasyVFR will create a new route starting from your current position, heading straight to that waypoint.
Your ETA, distance, and other navigation details are recalculated instantly.
Map Shortcut:
Tap on the map a waypoint that is part of the active route.
Select Direct-To in the Info Sheet.
Cancel Direct-To:
If you want to revert to your original route, simply select Cancel Direct-To in the Route Card.
All future legs will return to normal, and the route's calculations will switch back.
User Waypoints
Managing your waypoints is now more efficient and intuitive:
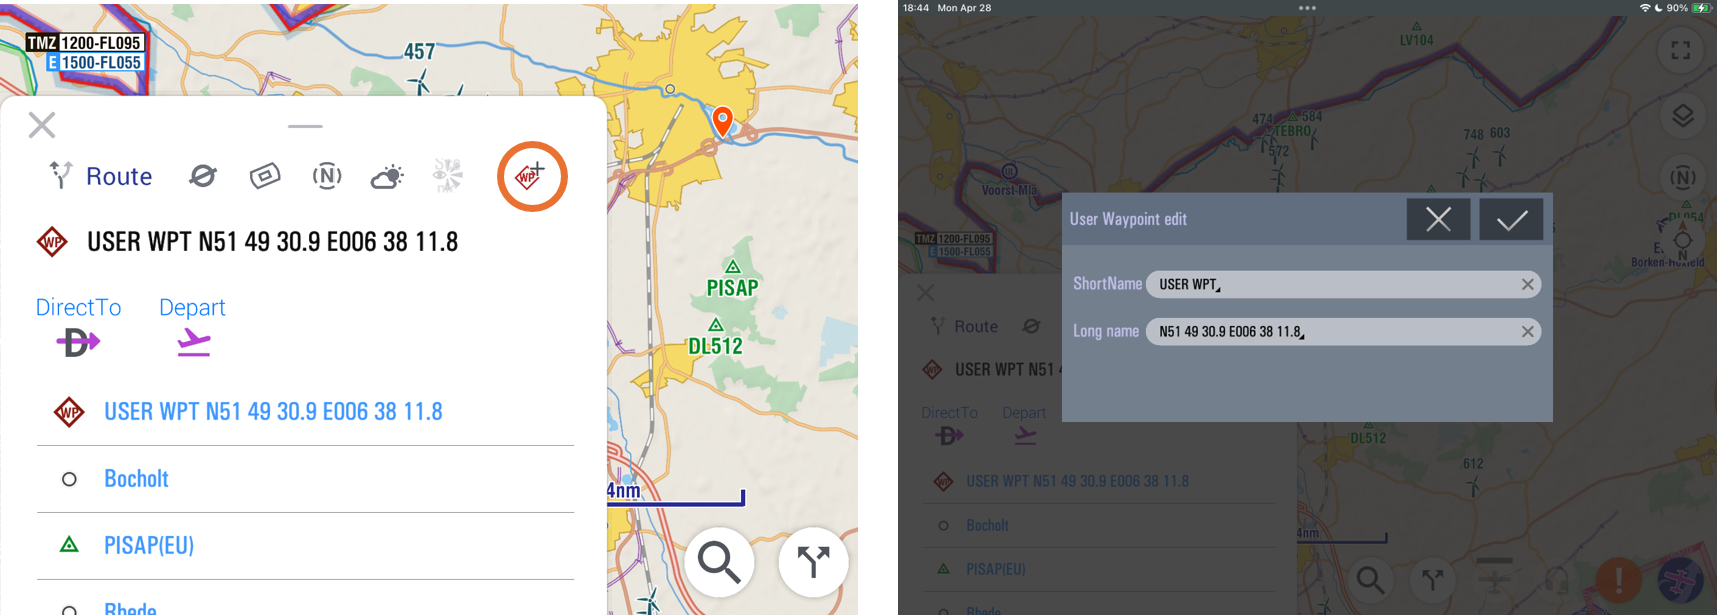
Create User Waypoints in the Info Sheet:
Open the Route (waypoint) Info Sheet by tapping any AeroData object or long-pressing on the map.
In the AeroData Info Sheet, select the WP+ Icon to create a new waypoint.
Enter the short and long name in the WP Edit modal that pops up, then save. The short name will appear on the map below the WP icon, and the full name will be visible in the Info Sheet.
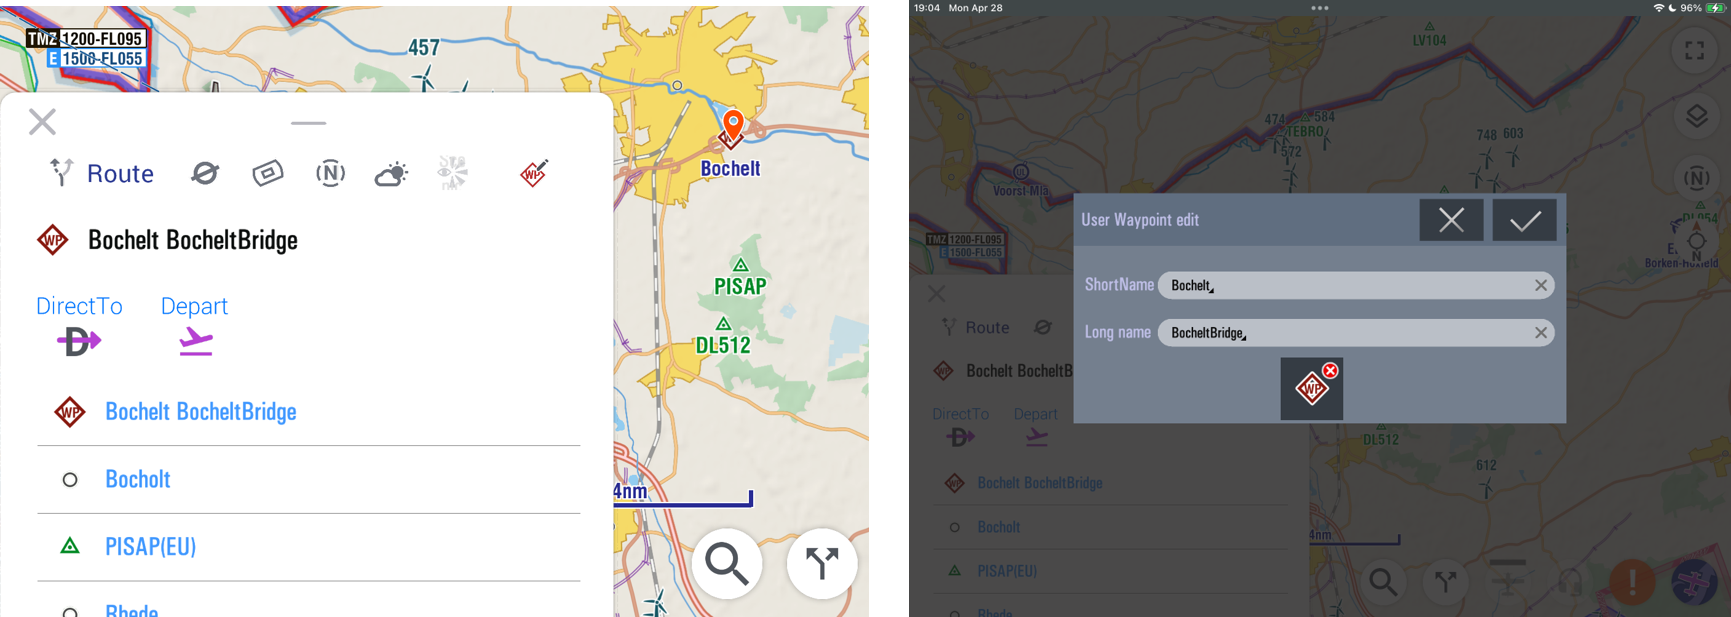
Edit or Delete User Waypoints:
Select a User Waypoint on the map, then choose the WP Pen Icon in the Info Sheet.
In the modal that appears, you can change the short and long name or select the delete button to remove the waypoint.
Import, Export, Manage All User Waypoints:
To list all User Waypoints, manage or export them, or import others go to the EasyVFR 4 menu (select the logo button) and navigate to My User Waypoints.
This streamlined process makes managing your waypoints faster and more intuitive!
Subscription Tier Differences
Essential and Live:
Limited to map-based route creation and manipulation.
Use of Route Totals and the Route Card.
Pro and FFM:
Unlock advanced Pro Route options including:
Importing/exporting routes.
Saving routes to and loading from the cloud.
Automatic Routing.
Creating routes via free text.
TripKit PDF conversion (includes navlog, mass & balance, weather, visual approach charts, and airport diagrams).
Conclusion
This guide has outlined the comprehensive route planning features available in EasyVFR 4—from flexible workflows and key UI elements to advanced Pro tools and Local Flight configuration. With these tools, you can plan and navigate your flight routes efficiently and safely.
Remember: This article is in progress. If you notice missing information, please check back later or contact support.